Concrete and Your Home by the Barrie Building Inspector
Tarion reports that each year a significant percent of basements are constructed with serious defects. At the same time, home buyers are demanding a higher standard of quality workmanship and moisture control than ever before. Part of this is due to consumer education by Home Inspections, TV Programs and articles on poor workmanship.
Concrete is basically a mixture of cement, water and aggregates. The paste, formed by cement and water, coats the surface of sand and stone, binding them together, to form concrete.
ASTM’s cement and concrete standards are instrumental in the evaluation and testing of concrete, cement, and aggregates. Concrete can have different properties depending upon the mixture that is used in creating it, which contains cement, chemical admixtures, and aggregates. These ingredients are mixed with water to create concrete which is used as a primary construction material in buildings.
One simple on site test typically performed in the concrete slump test. The slump test measures the consistency of the concrete in that specific batch. This test is performed to check the consistency of freshly made concrete. It is used to indicate the degree of wetness. Workability of concrete is mainly affected by consistency i.e. wetter mixes will be more workable than drier mixes, but concrete of the same consistency may vary in workability. It is also used to determine consistency between individual batches.
Regular concrete, such as used in residential construction, has a compressive strength rating, varying from 10 MPa (megapascal) to 40 MPa (5800 psi). Concrete cures for a period of 28 days when it will reach approximately 90% of its final strength. Controlling the moisture during the first three days is critical to preventing cracking and shrinkage. Allowing the moisture to evaporate too quickly can cause tensile stresses which can result in more shrinkage cracks. Keeping concrete damp during the curing process minimizes cracking. Spraying water over concrete and covering with plastic sheeting are two common methods used for residential construction. Concrete can continue curing and increasing in strength for up to 3 years.
Air entrainment is recommended for nearly all concretes, principally to improve resistance to freezing when exposed to water and deicing chemicals. Air-entrained concrete contains billions of microscopic air cells per cubic foot. These air pockets relieve internal pressure on the concrete by providing tiny chambers for water to expand into when it freezes. Air-entrained concrete is produced through the use of air-entraining portland cement, or by the introduction of air-entraining agents, under careful engineering supervision as the concrete is mixed on the job. The amount of entrained air is usually between 4 percent and 7 percent of the volume of the concrete, but may be varied as required by special conditions. Entrained Concrete
Chemical admixtures are the ingredients in concrete other than portland cement, water, and aggregate that are added to the mix immediately before or during mixing. Producers use admixtures primarily to reduce the cost of concrete construction; to modify the properties of hardened concrete; to ensure the quality of concrete during mixing, transporting, placing, and curing; and to overcome certain emergencies during concrete operations.
Your finish of the exterior of your basement determines the amount of MPa required by the Ontario Building Code. Most modern homes have a damp-proof coating, which was installed to meet local building code requirements as the home was being constructed. This is usually a tar or asphalt based product applied to the exterior or your home. This product is not to be confused with water proofing, which is a completely different process. Damp proofing allows the concrete to cure without moisture entering during this process. Many damp proofing will fail after a couple of years and if basement is subjected to high water table, will most likely leak in some form.
Many new home buyers confuse the dimple wrap placed around most basements as a water proof membrane. The dimple design of the wrap creates an air gap between the membrane and foundation wall so exterior drainage water or damp/wet earth is never in contact with the poured concrete or cement block foundation wall. Instead water will be drained to the weeping or drain tiles, leaving the foundation walls dry.
Many new home builders will repair any significant cracks by injection of foam or epoxy. Having a Pre-Delivery Inspection can identify these issues that you may miss and usually once that window of opportunity is missed, your on your own. Tarion will not require builder to repair crack unless it is wider than 1/2 inch or water is entering home. If you are in the Barrie area, call the Barrie Home Inspector, to accompany you on your Pre-Delivery inspection. It’s your Peace of Mind that is at stake.
Many custom home are using ICF building process to construct their foundations Insulated Concrete Forms may use polystyrene blocks or panels as the formwork into which reinforcing steel and concrete are placed. These polystyrene forms are left in place to give your home an exceptional R-value. Their history dates back to the period after World War II, when blocks of treated wood fibers held together by cement were used in Switzerland. Some of the benefits of ICF construction is the strength, disaster resistant, mold and rot resistant, sound deadening and energy efficient. Some companies refer to the lack of chemicals used compared to wood framing where there may be VOC’s present from glues etc.
Injection epoxy resins and urethane foam systems are the two most widely used materials in the repair of leaking cracks in concrete basement walls. Crack injection (with either injection epoxies, polyurethane foams, or polyurethane grouts) is the best and most economical method for repair of a leaking crack on the wall of a poured foundation. When the basement has a crack that needs to be structurally repaired and the area needs to be as strong or stronger than the concrete around it, use an epoxy. The main advantage of epoxies is their amazing compressive strength, which at 12,000 psi or greater exceeds that of most concrete. If the crack needs to be repaired only to prevent water leakage or the crack is actively leaking, a polyurethane is usually the best choice. Polyurethane products are typically elastomeric, fast-setting foams which are effective alternatives for applications involving only crack sealing (waterproofing) and not structural repair. Because of their elastomeric nature, they are able to accommodate slight concrete movement so the seal stays intact.
Concrete Surface Preparation
Remove loose or flaking concrete with a wire brush or sand blast the surface to ensure proper bond of the surface seal paste. It is important to clean surface to ensure bonding of ports.
Installing Injection Ports
Surface ports are most commonly used for low-pressure injection into concrete wall cracks. The older method of installing ports was to drill into crack on an angle to inject either the epoxy or polyurethane into the center of the crack. Today most ports are installed directly onto crack and the crack is then sealed with a surface sealer which allows injection at up to 40 psi pressures. Concrete cracks can move when exposed to a temperature cycle that normally occurs in a 24 hour period unless crack has been injected with foam or epoxy. Injection of crack should be done no later than 6 hours after sealing surface.
Foundation Crack Repair Injection
Product is injected at 20-40 PSI into the lowest port on the wall until the epoxy or urethane begins to flow from the port above it. That port is then capped and work continues to port located directly above. This procedure is repeated until the entire crack has been filled with the epoxy or polyurethane. Product should be topped up after 20 min or so to replace any sealant that has leaked out to the outside.
Foundation Finish
The ports can be removed by striking with a trowel or hammer. If cosmetic appearance is preferred, the surface seal can be chipped, ground (with sanding disk), or burned off. The surface seal is paintable if grinding is not desired. Wear protective clothing and breathing apparatus while grinding. If cosmetic appearance is preferred, the surface seal can be chipped or grounded off (with sanding disk).
The Barrie Home Inspector frequently comes across cracks in foundations that have been repaired using crack injection method. Some new home builders have their own crack injection specialist. As in any other trade you want to research whoever you choose for any repair. Length of time and experience is very important and also verifying references should be a priority. The Tarion Home Warranty program will not consider a crack in a basement wall a deficiency unless it is over 6mm in width or water is leaking from it. Concrete is not flexible and with the weight of entire structure being transferred to the footings a small amount of settlement can be expected.
Century Home Inspections Real estate buyers cannot seem to get enough good quality Century Homes. Anytime I am inspecting a fairly well maintained century home it seems that the buyers were just about always in a bidding war with someone else who also wanted the property. Considering the work and expense usually involved in fixing up one of these older homes, I find it amazing the lure these older homes have on people. Century homes can be a money pit or a beautiful piece of history, and sometimes it is hard for the novice home owner to recognize the difference. Any home that has been around this long has most likely had many renovations over the years and at least some of them were do it yourself type improvements. It takes a trained eye to spot the differences in workmanship but the end result could be thousands of dollars in repairs if home buyer is not aware of some of the common pitfalls involved in buying a century home.
There are some basic items that usually are an issue in century homes and if the previous owners have not properly dealt with them the home buyers will most likely be shocked to find the amount of work and expense they may be facing. Common items are structural, asbestos, knob and tube wiring, 60 amp service and galvanized plumbing.
Every foundation on a century home is different. There were no strict building codes a hundred years ago and everyone built their homes a little different although the concept was basically the same. Most structures are supported on rock and cement walls. These old walls will still be standing after we are long gone and are usually in pretty good shape. Water problems can affect the mortar between stones and if you have any movement you may have to bring in a structural engineer for advice. If your mortar is deteriorating you can remove loose bits and re-point the stones and even give it a coat of white wash for more appealing look. If your wall is bowing or showing other signs of significant movement there may be an issue with expansive soils causing pressure on your foundation wall. This will require the services of a an experienced foundation contractor and will most likely be an expensive repair. Some foundations may require a sister wall to be poured to strengthen the existing foundation, this also is a job for an experienced contractor. Many older homes have a concrete base poured around the existing foundation to add to stability and prevent movement.
[wp-like-locker]
Asbestos was used as an insulator for heating equipment and plumbing wrap in older homes. Although it is un-common to still find asbestos still in place in older homes there are areas where it may have been installed and very difficult to remove, so has been left in place. Service areas between floors is a common place to find left behind asbestos and can be very difficult to remove without replacing piping. Attics in century homes are common places to find vermiculite insulation. Any vermiculite manufactured in the Libby Montana mines is contaminated with asbestos. Asbestos cannot be visually detected in vermiculite and samples have to be sent out to labs for testing. Depending on amount and size of asbestos presence the cost of removal can be very expensive. Large amounts require encapsulated workers to have a completed sealed off work area and a decontamination area plus a clean zone. All asbestos must be properly bagged, tagged and disposed of in specific locations.
Many century homes had galvanized plumbing installed at one time in their past. This is a steel pipe which has been covered with a protective coating of zinc. One of the problems with galvanized pipe is that the minerals in the water react with galvanized material and cause scale build up. Life expectancy of most galvanized pipe is generally considered to be from 50 to 70 years, which becomes a problem if it is still in place in your potential new home. Some insurance companies will refuse to cover a home containing galvanized plumbing. Again many people will replace the accessible galvanized plumbing but may leave areas between floors and walls which are hard to access.
Knob and tube wiring is still in use in many older homes and many home owners don’t even know it is in their home. This is electrical wiring which is run between exposed porcelain insulators and looks a little like a train track as there are two conductors running beside each other. Most insurance companies will not ensure a home with knob and tube wiring and you will have to get an electrical contractor to replace any found in the home. Attics are common places where knob and tube was left and even connected to the newer type of Romex cable by either lazy electricians or un-educated home owners.
Many older homes can have a 100 amp panel installed and the listing may even list the property as having a 100 amp service, but this may not always be true. There are many times where the property owner has installed a 100 amp panel but has not upgraded the service. Always check the main switch where the service enters the building to ensure that it is not a 50 or 60 amp service that has just had a newer panel board installed. In Ontario most insurance companies will not insure a home with a 60 amp service and you will be required to upgrade service and sometimes the mast also may require an upgrade.
There are many other issues that potential buyers of century homes may encounter and some maybe very expensive to repair. Protect yourself and your investment with a professional home inspection which can prevent expensive surprises and allow you to objectively evaluate the property prior to purchase.
When buying a Century Home in Simcoe County call Roger Frost – Your Barrie Century Home Inspector
A typical basement is constructed of am 18 inch footing that supports the basement walls and floor. The footing must rest on solid or undisturbed soil. If the footing is on wet soil it is required to be 36 inches wide. The wall may be constructed of cement block, poured concrete, brick, stone or even wood. In the past 80 years, most foundation walls have been constructed of cement block or poured concrete. Many custom homes now use the ICF type of construction for greater insulation value. The floor is poured concrete supported on the edges by the footing and in the center by compacted gravel.
Tarion Warranty
Most builders would agree that water leaking into the basement is a common warranty issue. Tarion will cover any water leakage for 2 years from date of possession. The majority of foundation cracks are typically due to drying shrinkage, thermal movement or other causes which are usually are minor in nature and result in few issues. Occasionally a foundation crack will widen over time and result in water seepage or possibly the loss of structural integrity. Foundation and slab cracks are not only an eyesore, but they may hinder the resale value of the home.
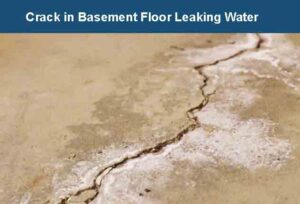
Cracks in Basement Floor
Most basement concrete floors have hairline cracks throughout the basement area. These cracks are typically due to shrinkage of the concrete. Some homes may have more cracks but that could be just due to the concrete being poured on a really hot day causing excessive shrinkage. Your Tarion warranty on a brand new home does not cover shrinkage cracks in your basement floor. Unless there is water coming through the cracks or there is a verticle serparation at the crack, which indicates some structural type of movement, then you have nothing to worring about.
Cracks in the floor or the space left where the floor meets the wall (called the cove joint) rarely, if ever, leak as long as the sump system and weeping tile system are working properly. On occasion, the cove joint can show signs of moisture in areas a great distance from the pump or in alcoves or bays. This joint can be injected with urethane and, when cured, repel the water long enough to allow it to drain. This is assuming the weeping tile is not blocked. Cracks in the floor should never leak. If water is coming up through floor cracks, the pump may not be working or the weeping tile has a blockage.
Water Penetrating Cracks in Floor
Anytime you have water penetrating cracks in basement floor it is a cause for concern. First, check your sump pump to ensure it is operational. If it is in working condition then you have to start thinking about repairs or how to remidiate the water entry. If you have a new home notify the builder and Tarion immediately and ensure you send emails documenting everything to both parties. Take pictures of water, pictures of the cracks and pictures of a ruler showing the width and height of cracks. You can never have too much information and you definately want a proveable paper trail documenting your communications with both Builder and Tarion.
When hiring a contractor to fix the water entry isssue ensure you get more than one quote and explore different repair options. One option I see a lot of is the practice of digging a trench around inside of the exterior walls and installing weeping tile in granular mix which then drains to sump pump. I personally would never use this method as I would not be comfortable with water constently passing through my foundation walls.
When buying a home a good indicator of this type of though the wall drainage system is the visible Black Dimple Wrap which extends up the wall. Most sellers or Realtors will not disclose this type of repair so it is up to your Home Inspector to observe and notify you so you can then make an informed decision about buying the home.
Foundation Wall Holes
Rod holes are created by the contractor when securing his forms together. In order to hold the concrete forms together and to prevent bulging from the weight of wet concrete, 5/8″ steel rods are connected through the forms from one side to the other. After the concrete is poured, the forms are stripped off and the rods are removed leaving a 5/8″ hole passing right through your foundation wall. The holes are then patched with a dollop of hydraulic cement on the inside and the outside. Some poured foundation use a smaller rod which is broken off in the interior and exterior wall surface. The resulting hole is typically filled with non-shrink grout or hydraulic cement.
Some basement water problems occasionally arise during the construction process and disappear when a home’s drainage system is fully functional. There are three basic causes of seepage and cracks in basements. First, the original workmanship may be poor. Second, the house may have settled, causing cracks in either the floor or walls. Finally, water pressure from the outside may have built up and be forcing water through the walls.
Another area where water problems are commonly found is at the point where pipes penetrate the wall. To do this, a hole is left in the foundation so that the pipe can be placed through the wall. After the pipe has been fed through the wall, the contractor will often use hydraulic cement to close the opening from inside the basement. Hydraulic cement begins to cure in minutes so it is usually only pushed two to three inches into the wall. Vibration in the pipe, among other factors, will often compromise the seal of the cement and cracking it (resulting in the area to leak again).
Many basement water problems are created by poor grading or improper drainage. Your roof alone can discharge 1500 L per hour in a heavy downpour which may be distributed into an average of 4 downspouts. These downspouts should be extended to ensure that water is directed away from your home and not collecting against your homes foundation. Many homeowners will build sidewalks or planters which will impede or even collect water from rain, snow and downspout discharge. This water will eventually find its way through your basement wall in the form of moisture or even a water leak. Simple maintenance of downspouts and landscaping will prevent most common basement water issues.
It is adviseable to have any water issues with your basement repaired prior to starting any renovations. Adding electrical components to a wall with a possible water leak is not a good practice.
Masonry Blocks and Mortar Explained. One of the most common masonry units is the concrete block. It consists of hardened cement and may be completely solid or contain single or multiple hollows. It is made from conventional cement mixes and various types of aggregate. These include sand, gravel, crushed stone, air-cooled slag, coal cinders, expanded shale or clay, expanded slag, volcanic cinders (pozzolan), pumice, and “scotia” (refuse obtained from metal ore reduction and smelting). The term “concrete block” was formerly limited to only hollow masonry units made with such aggregates as sand, gravel, and crushed stone. Today, the term covers all types of concrete block-both hollow and solid—made with any kind of aggregate. Concrete blocks are also available with applied glazed surfaces, various pierced designs, and a wide variety of surface textures.Although concrete block is made in many sizes and shapes (figure 8-4) and in both modular and nonmodular dimensions, its most common unit size is 7 5/8 by 7 5/8 by 15 5/8 inches. This size is known as 8-by-8-by- 16-inch block nominal size. All concrete block must meet certain specifications covering size, type, weight, moisture content, compressive strength, and other characteristics. Properly designed and constructed, concrete masonry walls satisfy many building requirements, including fire prevention, safety, durability, economy, appearance, utility, comfort, and acoustics.Figure 8-4.-Typical unit sizes and shapes of concrete masonry units.Concrete blocks are used in all types of masonry construction. The following are just a few of many examples:
Exterior load-bearing walls (both below and above grade)
Interior load-bearing walls
Fire walls and curtain walls
Partitions and panel walks
Backing for brick, stone, and other facings; Fireproofing over structural members
Fire safe walls around stairwells, elevators, and enclosures
Piers and columns; Retaining walls
Chimneys
Concrete floor units
There are five main types of concrete masonry units:
Hollow load-bearing concrete block
Solid load-bearing concrete block
Hollow nonload-bearing concrete block
Concrete building tile
Concrete brick
Load-bearing blocks are available in two grades: N and S. Grade N is for general use, such as exterior walls both above and below grade that may or may not be exposed to moisture penetration or weather. Both grades are also used for backup and interior walls. Grade S is for above-grade exterior walls with a weather-protective coating and for interior walls. The grades are further subdivided into two types. Type I consists of moisture-controlled units for use in arid climates. Type II consists of nonmoisturecontrolled units.Figure 8-4.-Typical unit sizes and shapes of concrete masonry units—Continued.BLOCK SIZES AND SHAPESConcrete masonry units are available in many sizes and shapes to tit different construction needs. Both full- and half-length sizes are shown in figure 8-4. Because concrete block sizes usually refer to nominal dimensions, a unit actually measuring 7 5/8-by-7 5/8-by-15 5/8-inches is called an 8-by-8-by-16-inch block. When laid with 3/8-inch mortar joints, the unit should occupy a space exactly 8-by-8-by- 16 inches.ASTM (American Society for Testing and Materials) specifications define a solid concrete block as having a core area not more than 25 percent of the gross cross-sectional area. Most concrete bricks are solid and sometimes have a recessed surface like the frogged brick shown in figure 8-4. In contrast, a hollow concrete block has a core area greater than 25 percent of its gross cross-sectional area-generally 40 percent to 50 percent.Blocks are considered heavyweight or lightweight, depending on the aggregate used in their production. A hollow load-bearing concrete block 8-by-8-by- 16-inches nominal size weighs from 40 to 50 pounds when made with heavyweight aggregate, such as sand, gravel, crushed stone, or air-cooled slag. The same size block weighs only 25 to 35 pounds when made with coal cinders, expanded shale, clay, slag, volcanic cinders, or pumice. The choice of blocks depends on both the availability and requirements of the intended structure.Blocks may be cut with a chisel. However, it is more convenient and accurate to use a power-driven masonry saw (figure 8-5). Be sure to follow the manufacturer’s manual for operation and maintenance, As with all electrically powered equipment, follow all safety guidelines.Figure 8-5.-Masonry saw.BLOCK MORTAR JOINTSThe sides and the recessed ends of a concrete block are called the shell. The material that forms the partitions between the cores is called the web. Each of the long sides of a block is called a face shell. Each of the recessed ends is called an end shell. The vertical ends of the face shells, on either side of the end shells, are called the edges.Bed joints on first courses and bed joints in column construction are mortared by spreading a 1-inch layer of mortar. This procedure is referred to as “full mortar bedding.” For most other bed joints, only the upper edges of the face shells need to be mortared. This is referred to as “face shell mortar bedding.”Head joints may be mortared by buttering both edges of the block being laid or by buttering one edge on the block being laid and the opposite edge on the block already in place.MASONRY MORTARProperly mixed and applied mortar is necessary for good workmanship and good masonry service because it must bond the masonry units into a strong, well-knit structure. The mortar that bonds concrete block, brick, or clay tile will be the weakest part of the masonry unless you mix and apply it properly. When masonry leaks, it is usually through the joints. Both the strength of masonry and its resistance to rain penetration depend largely on the strength of the bond between the masonry unit and the mortar. Various factors affect bond strength, including the type and quantity of the mortar, its plasticity and workability, its water retentivity, the surface texture of the mortar bed, and the quality of workmanship in laying the units. You can correct irregular brick dimensions and shape with a good mortar joint.Workability of MortarMortar must be plastic enough to work with a trowel. You obtain good plasticity and workability by using mortar having good water retentivity, using the proper grade of sand, and thorough mixing. You do not obtain good plasticity by using a lot of cementitious materials. Mortar properties depend largely upon the type of sand it contains. Clean, sharp sand produces excellent mortar, but too much sand causes mortar to segregate, drop off the trowel, and weather poorly.Water RetentivityWater retentivity is the mortar property that resists rapid loss of water to highly absorbent masonry units. Mortar must have water to develop the bond. If it does not contain enough water, the mortar will have poor plasticity and workability, and the bond will be weak and spotty. Sometimes, you must wet brick to control water absorption before applying mortar, but never wet concrete masonry units.Mortar Strength and DurabilityThe type of service that the masonry must give determines the strength and durability requirements of mortar. For example, walls subject to severe stress or weathering must be laid with more durable, stronger mortar than walls for ordinary service. Table 8-1 gives mortar mix proportions that provide adequate mortar strength and durability for the conditions listed.Table 8-1.-Recommended Mortar Mix Proportions by Unit VolumeTypes of MortarThe following mortar types are proportioned on a volume basis:
Type M— One part portland cement, one-fourth part hydrated lime or lime putty, and three parts sand; or, one part portland cement, one part type II masonry cement, and six parts sand. Type M mortar is suitable for general use, but is recommended specifically for below-grade masonry that contacts earth, such as foundations, retaining walls, and walks.Type S— One part portland cement, one-half part hydrated lime or lime putty, and four and one-half parts sand; or, one-half part portland cement, one part type II masonry cement, and four and one-half parts sand. Type S mortar is also suitable for general use, but is recommended where high resistance to lateral forces is required.
Type N— One part portland cement, one part hydrated lime or lime putty, and six parts sand; or, one part type II masonry cement and three parts sand. Type N mortar is suitable for general use in above-grade exposed masonry where high compressive or lateral strength is not required.Type O— One part portland cement, two parts hydrated lime or lime putty, and nine parts sand; or, one part type I or type II masonry cement and three parts sand. Type O mortar is recommended for load-bearing, solid-unit walls when the compressive stresses do not exceed 100 pounds per square inch (psi) and the masonry is not subject to freezing and thawing in the presence of a lot of moisture.
MIXING MORTARThe manner in which mortar is mixed has a lot to do with the quality of the final product. In addition to machine and hand mixing, you need to know the requirements for introducing various additives, including water, to the mix in order to achieve optimum results.Machine MixingMachine mixing refers to mixing large quantities of mortar in a drum-type mixer. Place all dry ingredients in the mixer first and mix them for 1 minute before adding the water. When adding water, you should always add it slowly. Minimum mixing time is 3 minutes. The mortar should be mixed until a completely uniform mixture is obtained.Hand MixingHand mixing involves mixing small amounts of mortar by hand in a mortar box or wheelbarrow. Take care to mix all ingredients thoroughly to obtain a uniform mixture. As in machine mixing, mix all dry materials together first before adding water. Keep a steel drum of water close at hand to use as the water supply. You should also keep all your masonry tools free of hardened mortar mix and dirt by immersing them in water when not in use.RequirementsYou occasionally need to mix lime putty with mortar. When machine mixing, use a pail to measure the lime putty. Place the putty on top of the sand. When hand mixing, add the sand to the lime putty.Wet pails before filling them with mortar and clean them immediately after emptying.Mixing water for mortar must meet the same quality requirements as mixing water for concrete. Do not use water containing large amounts of dissolved salts. Salts weaken the mortars.You can restore the workability of any mortar that stiffens on the mortar board due to evaporation by remixing it thoroughly. Add water as necessary, but discard any mortar stiffened by initial setting. Because it is difficult to determine the cause of stiffening, a practical guide is to use mortar within 2 1/2 hours after the original mixing. Discard any mortar you do not use within this time.Do not use an antifreeze admixture to lower the freezing pint of mortars during winter construction. The quantity necessary to lower the freezing point to any appreciable degree is so large it will seriously impair the strength and other desirable properties of the mortar.Do not add more than 2-percent calcium chloride (an accelerator) by weight of cement to mortar to accelerate its hardening rate and increase its early strength. Do not add more than 1-percent calcium chloride to masonry cements. Make a trial mix to find the percentage of calcium chloride that gives the desired hardening rate. Calcium chloride should not be used for steel-reinforced masonry. You can also obtain high early strength in mortars with high-early-strength portland cement.MODULAR PLANNINGConcrete masonry walls should be laid out to make maximum use of full- and half-length units. This minimizes cutting and fitting of units on the job. Length and height of walls, width and height of openings, and wall areas between doors, windows, and corners should be planned to use full-size and half-size units, which are usually available (figure 8-6). This procedure assumes that window and door frames are of modular dimensions which fit modular full- and half-size units. Then, all horizontal dimensions should be in multiples of nominal full-length masonry units.Figure 8-6.-Planning concrete masonry wall openings.Both horizontal and vertical dimensions should be designed to be in multiples of 8 inches. Table 8-2 lists nominal length of concrete masonry walls by stretchers. Table 8-3 lists nominal height of concrete masonry walls by courses. When 8-by-4-by-16 units are used, the horizontal dimensions should be planned in multiples of 8 inches (half-length units) and the vertical dimensions in multiples of 4 inches. If the thickness of the wall is greater or less than the length of a half unit, a special-length unit is required at each corner in each course. Table 8-4 lists the average number of concrete masonry units by size and approximate number of cubic feet of mortar required for every 100 square feet of concrete masonry wall. Table 8-5 lists the number of 16-inch blocks per course for any wall.Table 8-2.-Nominal Lengths of Concrete Masonry Walls in StretchersTable 8-3.-Nominal Heights of Modular Concrete Masonry Walls in CoursesTable 8-4.-Average Concrete Masonry Units and Mortar per 100 sq. ft. of WallTable 8-5.-Number of 16-Inch Blocks per CourseYou should always use outside measurements when calculating the number of blocks required per course. For example, a basement 22 feet by 32 feet should require 79 blocks for one complete course. Multiply 79 by the number of courses needed. Thus, a one-course basement requires a total of 790 blocks for a solid wall, from which deductions should be made for windows and doors. If any dimension is an odd number, use the nearest smaller size listed in the table. For example, for a 22-foot by 31-foot enclosure, use 22 feet by 30 feet and add one-half block per row.As a Builder, you might find yourself in the field without the tables handy, so here is another method. Use 3/4 times the length and 3/2 times the height for figuring how many 8-by-8-by-16-inch blocks you need for a wall. Let’s take an example:Given: A wall 20 ft long x 8 ft high
3/4 x 20 = 60 + 4 = 15 (8″ x 8″ x 16″ block per course) 3/2 x 8 = 24 ÷ 2 = 12 courses high 15 x 12 = 180 total blocks
ESTIMATING MORTARYou can use “rule 38” for calculating the raw material needed to mix 1 yard of mortar without a great deal of paperwork. This rule does not, however, accurately calculate the required raw materials for large masonry construction jobs. For larger jobs, use the absolute volume or weight formula. In most cases, though, and particularly in advanced base construction, you can use rule 38 to quickly estimate the quantities of the required raw materials.Builders have found that it takes about 38 cubic feet of raw materials to make 1 cubic yard of mortar. In using rule 38 for calculating mortar, take the rule number and divide it by the sum of the quantity figures specified in the mix. For example, let’s assume that the building specifications call for a 1:3 mix for mortar, 1 + 3 = 4. Since 38 ÷ 4 = 9½, you’ll need 9½ sacks, or 9½ cubic feet, of cement. To calculate the amount of fine aggregate (sand), you multiply 9½ by 3. The product (28½ cubic feet) is the amount of sand you need to mix 1 cubic yard of mortar using a 1:3 mix. The sum of the two required quantities should always equal 38. This is how you can check whether you are using the correct amounts. In the above example, 9½ sacks of cement plus 28½ cubic feet of sand equal 38.SAFE HANDLING OF MATERIALWhen you handle cement or lime bags, wear goggles and snug-fitting neckbands and wristbands. Always practice good personal cleanliness and never wear clothing that has become stiff with cement. Cement-impregnated clothing irritates the skin and may cause serious infection. Any susceptibility of the skin to cement and lime burns should be reported. Personnel who are allergic to cement or lime should be transferred to other jobs.Bags of cement or lime should not be piled more than 10 bags high on a pallet. The only exception is when storage is in bins or enclosures built for such storage. The bags around the outside of the pallet should be placed with the mouths of the bags facing the center, The first five tiers of bags each way from any corner must be cross piled. A setback starting with the sixth tier should be made to prevent piled bags from falling outward. If you have to pile bags above 10 tiers, another setback must be made. The back tier, when not resting against an interior wall ofsufficient strength to withstand the pressure, should be set back one bag every five tiers, the same as the end tiers. During unpiling, the entire top of the pile should be kept level and the necessary setbacks maintained.Lime and cement must be stored in a dry place. This helps prevent lime from crumbling and the cement from hydrating before it is used.
For more information on fixing or repairing your home visit Barrie Home Inspector Articles
Doing Your Own Basement Waterproofing. Basements are a great space to enjoy for the whole family as long as there is no water problem. They can be a living space, amusement room, or storage space. Prior to enjoying the use of your basement or start any renovation or remodelling project, to enjoy any of those functions, it must be waterproof. Waterproofing prevents excessive indoor humidity that can result to a space that is damp, musky and unpleasant to occupy, and there is also the possible hazard to your health due to the mold or mildew growth. Excessive moisture can also affect the structural stability of your basement, wood will start rotting once it reaches 20% moisture level. Many homeowners prefer to attempt waterproofing their basement themselves to save money.
Can the average homeowner waterproof the basement without professional help? There are steps that you as a homeowner can do to to help waterproof your basement and prevent the infiltration of water and moisture. For example, make sure that the land surrounding your basement has adequate drainage away from structure for at least six feet. Also, to help with water drainage you should keep your downspouts and eaves clear of leaves and debris and ensure that discharge is directed away from home. However, these are not adequate as waterproofing strategies, they are only methods to reduce water build up around your foundation walls. Generally, to waterproof your basement effectively, you need to work with a professional.
Why employ a professional when waterproofing your basement?
Waterproofing is not a project that most homeowners have the knowledge, expertise or equipment for. It needs expertise, experience and a knowledge of various skills to successfully waterproof a basement. An trained and experience basement repair expert can also recognize with greater accuracy the problems that cause seepage and leakage into your basement. If you overlook the cause of the water problems you can waste money and time and may even make the problem worse. Quick fixes are never a lasting solution when it comes to wett basements. An expert can offer you long-term waterproofing solution and will back up his work with a written guarantee. Working with a professional can be more pricey than carrying out the project by yourself, but it will usually be worth the investment.
How to find a Water Proofing contractor
There is typically a large number basement-waterproofing contractors operating in your area, it can be somewhat a daunting task to choose which one to hire for your basement. The easiest way to hire a reliable contractors is by asking people you know, especially those who waterproofed their basement in recent years. Also, you may use Google or HomeStars to find contractors. Prices can fluctuate by quite a bit when comparing different waterproofing contractors, but make sure you don’t base your decision on price. Rather, you should look at their reputation and references when picking a waterproofing contractor. Last but not least, make sure that the one you’re going to hire has the required licenses and enough insurance coverage to compensate you if project goes awry.
Your Professional Home Inspector – Barrie Home Inspector will advise you of any water problems when you buy a new or existing home.