| Suggestions for keeping your wood burner working as it should. |  |
The
Wood Heat Organization: Answers to your questions about burning wood for heat and enjoyment. |
| Suggestions for keeping your wood burner working as it should. | |
The
Wood Heat Organization: Answers to your questions about burning wood for heat and enjoyment. |
Maintenance
of modern stoves, fireplaces, inserts, furnaces and boilers
It
is not always possible to generalize accurately about service and
maintenance because of the differences among the categories of wood
burning equipment. But, here are some suggestions for keeping your wood
burner working the way it was intended to. Door
Adjustment
Test
the seal on the loading door with paper money. Open the door on a cold
stove, place the bill across the gasketed area of the door, then close
and latch the door. Try to remove the bill by pulling. The bill should
not pull out easily. If there is an area where the bill slips out easily
the door seal needs attention. The
first thing to try is to adjust the door latch. Some stoves have a
mechanism to adjust the door as the gaskets compact through use, and
some do not. (That is
something to look for when purchasing a new wood heater.) If
you can't adjust the door, or if after adjustment the bill pulls out
easily in one or more places, you will probably have to replace the door
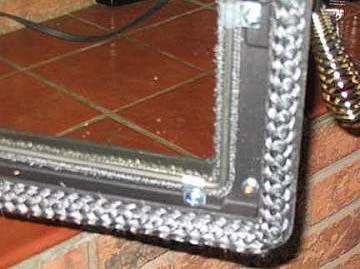
gasket(s). Door
gaskets
All
air-controlled appliances have a method of reducing random leaks into
the firebox so that air only enters the stove through the air control.
While a very few older stoves have carefully fitted ground cast iron
surfaces that seal reasonably well without gaskets, virtually all modern
wood heaters use gasket material around the loading doors to seal them.
Some ash pan doors also have gaskets.
You
can purchase gasket cement in a small tube or tub. If you can't find
gasket cement don't despair. You can use common silicone sealant in a
caulking tube. Some have said that silicone hardens the gasket sooner
than stove cement, but that's not a clear consensus, so don't be afraid
to try it. High temperature silicone is not necessary because the
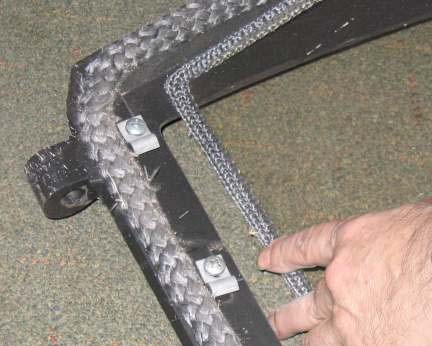
temperature rating of household grade seems to work well enough. To
install the gasket, remove the door and place it on cardboard or cloth
to prevent scratching of the finish. Pull out the existing gasket; on
some stoves you'll have to disassemble the door to get the gasket out.
Clean the gasket groove with an old screwdriver to remove any lumps of
old cement. Clean
the groove thoroughly with course steel wool so that it provides a good
clean surface for the cement to stick to. Using
the cement or silicone, apply a narrow (usually 1/4" to 1/2"
wide, depending on gasket size) bead along the entire groove.
Lay the gasket in the groove without stretching or bunching it,
starting on a long straight part of the groove. Cut the gasket slightly
long so that the ends can be tucked into each other forming a good seal.
Press the gasket into the cement. Mount
the door and test the seal. Slamming the door lightly, you should hear
the muffled sound of the gasket, not metal, hitting the stove body. Test
the seal with the bill. Glass
Modern
wood heaters use a clear ceramic material instead of the tempered glass
that older fireplaces used. This ceramic material is usually called
stove glass for simplicity. It will not break with heat generated by
wood burners, but it can break if the fasteners are over-tightened or if
it is struck hard with a poker or piece of wood.
Stove
glass is very expensive, but should never need to be replaced, although
some stove models seem to cause etching of the glass with normal use
over time. You may wish to replace it to renew the clear fireviewing. Regular
maintenance and replacing glass will require you to tighten glass
fasteners. When so doing ensure that you tighten them lightly, allowing
room for the glass to expand when heated. If
you crack your glass, in many cases the stove may be used for a short
term while you find a replacement. Replacement glass can be cut to size
by a specialty wood heating store or sweep. Alternatively, you can buy
replacement glass supplied by the stove manufacturer. Some
EPA certified stoves use specially coated glass. Check your manual.
If this is the case, you can buy replacement coated glass from a
dealer. Coated glass has a special side facing out. Check it and ensure
you are installing the right way out. Paint
Stoves
have been painted with high temperature paint since the 1970s. Good
stove paint is widely available and will withstand high stove
temperatures. Spray cans of stove paint can be used to touch up your
installed stove to make it look like new without removing it to a shop.
Let the stove cool down first. Mask those parts not to be painted and
protect everything around the stove from over spray. Most stove paint
dries to the touch in about fifteen minutes. Colors
are widely available too, so you can experiment by changing from
traditional black to a more decorative color. How about a two-tone paint
job? Enamel
Some
stoves are factory enameled, finish that cannot be added later. Enamel is very tough, even under heat
stress, but can be damaged by chipping.
Touch up and enamel filler kits are available from stove dealers. Cast
Iron Stove Rebuilding
Cast
iron stoves are usually built using "tongue in groove"
construction, which, while durable, may require maintenance. The
owner's manual usually suggests breaking the stove in over time with a
few fires. These increasingly hot fires melt the stove cement in the
channels allowing the cement to fill every crevasse, thus ensuring air
tightness. If
a cast stove is moved from its original location
cracks in the cement can develop, meaning that the stove
will leak air and be harder to control. If
a cast stove leaks too much air, and the gaskets are in good shape, it should be torn down and rebuilt with
new stove cement in the grooves. Firebrick
Firebrick
is used in many wood stoves to protect steel or cast iron while
increasing firebox temperatures for better combustion. Modern EPA
certified wood heaters often use a lighter, lower density brick for
higher performance. When replacing such brick it's important to replace
with the same brick type to maintain your stove's efficiency. Cracked
firebricks, which remain in position, do not have to be replaced
immediately. The bricks in most stoves and furnaces are a standard size,
which is half the size of a normal house brick. They measure about 4
1/2" x 9" x 1 1/4" inches, and are referred to as
firebrick 'splits'. Standard splits can be purchased at some building
supply stores, but the special low density bricks found in some EPA
certified stoves must be purchased from a wood stove dealer. Baffles
Baffles
in wood heaters reflect heat towards the fire, increase the length of
the flame path and create a chamber for secondary combustion, all of
which are essential for clean burning and high efficiency. They may be
steel, cast iron, firebrick, ceramic fiber board or a combination of
these materials. Since they are exposed to flame on both sides, baffles
get very hot and may fail over time. Removal and replacement is usually
detailed in the owner's manual. Replacement parts can be ordered from
stove retailers or directly from the manufacturer. Some
horizontal baffles include a ceramic fiber blanket, which usually lies
on top of the baffle. During maintenance and cleaning, this blanket must
be pressed down flat so that it doesn't block the area above the baffle
where the exhaust flows. Ceramic fibers should be treated like asbestos;
airborne particles should not be inhaled. Special
refractory
The
term refractory means a material that can tolerate high temperatures and
is usually in the form of firebrick or ceramic fiber. Some stoves use
custom-cast refractory components for a secondary combustion chamber.
These are usually white or off-white material and may be very
soft board like material or a hard masonry material. In either case they
should be handled gently. Avoid breathing any dust created by handling.
Repair may be possible in cases of breaking in some cases. Replace when
necessary with factory-supplied components. Air
tubes
Stainless
steel air tubes are used at the top of the fire below the horizontal
baffle in many modern EPA certified stoves. The intense heat in this
location can cause them to sag or disintegrate in time. The tubes are
removable by undoing the fastener or turning to unlock the keyed ends.
Replace with factory parts and new fasteners. Catalysts
Catalytic
elements deteriorate over time, generally lasting 12,000 hours or about
six years, provided they are cared for properly. Your owner's manual
gives directions on cleaning, inspecting and replacing them. EPA
standards dictate a six year prorated warranty, which you should be read
to understand how to care for the combustor. After
a few years of use, or if you see a change in stove performance, it is a
good idea to inspect the catalyst. This can usually be done without
removing it from the stove. If the catalytic element looks good, is all
about the same beige color and has no pieces missing, it is probably
still functioning and suitable for continued use. You
can check the condition of the catalyst by watching the smoke at the top
of the chimney. decrease dramatically when the catalyst is engaged. Cleaning
the catalyst involves removal from the stove and gentle vacuuming and /
or sweeping with a soft brush. If a catalytic element has pieces missing
or if the coating shows signs of flaking, replacement is the only
option. Warped
steel parts
Interior
steel parts in a stove may warp over time. In some cases this distortion
is acceptable because it does not affect performance. In other cases,
warping may allow exhaust to bypass the combustion system, producing a
drop in efficiency. Warped parts should be replaced with components
supplied by the appliance manufacturer. Structural welded steel plates, such as sides, back and top, that warp may be unsightly, but provided that there's no leakage, the appliance can continue to be used. These parts of welded steel stoves are not replaceable so if they crack or badly distort it means the body is shot and should be recycled. Cracked
castings Cast iron may warp or crack through time, but it's usually a
sign of severe stress caused by overfiring, often due to leaks in joints
between castings. Interior parts may be replaced with
manufacturer-supplied parts. Exterior parts may be replaced by a
complete teardown and rebuilding.
|