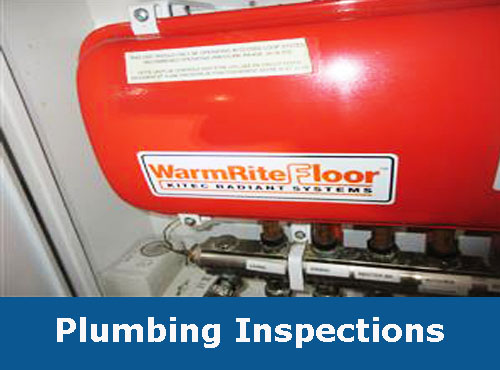
Plumbing is any system that conveys fluids for a wide range of applications. Plumbing uses pipes, valves, plumbing fixtures, tanks, and other apparatuses to convey fluidsDuring your Home Inspection we will visually inspect your homes plumbing system. This inspection includes plumbing supply lines, drains and vents for proper operation.
Read More
As a potential purchaser you will be informed if it suspected that the plumbing or other systems has been installed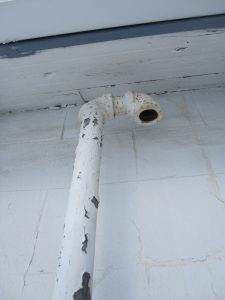 without a building permit. Not having a Building Permit means that none of the installed plumbing was inspected prior to being covered by concrete or drywall. Once you take possession of the home, this problem becomes yours and you could be facing expensive repairs in the future.
All plumbing waste fixtures use traps to prevent sewer gases from leaking into the house. Through traps, all fixtures are connected to waste lines, which in turn take the waste to a “soil stack”, or “soil vent pipe”. At the building drain system’s lowest point, the drain-waste vent is attached, and rises (usually inside a wall) to and out of the roof. Waste exits from the building through the building’s main drain and flows through a sewage line, which leads to a septic system or a public sewer. All soil vent pipes are required to teminate a minumum of 6 inches above the roof. ( maybe higher depending on local snow load conditions. ( plumbing vent picture on right shows vent under soffit which is in violation of plumbing code )
Copper Plumbing Inspection
Copper supply lines were very popular in the latter part of the twentieth century and replaced galvanized plumbing lines which were common at that time. In later years a switch was made from using lead based solder to non-lead solder. During 2004 to 2007 Chinese made copper plumbing was imported during the housing boom. This copper pipe did not meet the Standard Grades of Plumbing ( K, L & M ) and in many instances the pipe has sprung pin hole leaks in sections of pipe and would require replacement. The Chinese copper pipe was found to have pitting corrosion which creates small pin hole leaks. All metal piping will build up with scale over time, blocking the flow of water. The quality of your local water will affect the amount of scale and time it takes to affect your plumbing. If you have hard water or high iron content then using a water softener is recommended.
Galvanized Plumbing Inspection
Prior to the 1950’s most homes were built with galvanized plumbing, which replaced cast iron and lead pipes. Today many home insurance companies will not insure a home with galvanized plumbing installed. The reasons for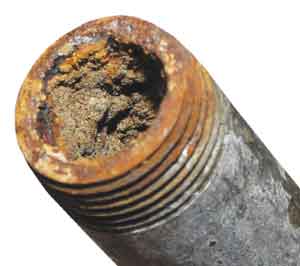 this are quite simple; the galvanized pipe has long exceeded it service life expectancy and it typically corrodes from the inside out, possibly giving no warning prior to failure. One sure sign of potential problems with your galvanized plumbing is when you start to notice a drop in water pressure or in some cases actual particles of rust start appearing in your sink. This is the time to call in a professional plumber before you have a possibly disastrous water leak.
Pex Plumbing Inspection
Pex plumbing is Cross-linked polyethylene, commonly abbreviated PEX is a form of polyethylene with cross-links. It is used predominantly in residential and commercial plumbing installations for hydronic radiant heating and cooling systems, and domestic water piping. PEX is advantageous in that it can flexibly bend around corners as compared to copper and polyvinyl chloride piping. Hence making PEX easier and quick to install. On the other hand, research has shown that PEX is associated with much failures compared to copper and PVC plumbing systems. Among the failures is the occurrence of fitting failures water leakages that causes great damage. Dezincification was a major cause of many pex fitting failures, which has caused most companies to use dezincification brass. Many professional plumbers wil install “home runs” supplied off a copper manifold to eliminate any hidden connections behind walls.. The standard method for connecting PEX pipe to brass PEX fittings uses a copper crimp ring and a PEX crimping tool. The copper crimp ring is inserted over the pipe, the fitting is inserted inside the pipe, and the copper ring is crimped over the pipe and fitting using the PEX crimping tool. Most newer subdivision homes all have some brand of Pex plumbing installed. ( Wirsbo AquaPex is the most common brand I see in the Barrie area) Common causes of pex pipe failure are when the pipes are exposed to chlorine that is within the water, exposure to direct sunlight before its installation. Furthermore PEX pipe is vulnerable when it comes in contact with such solutions as petroleum products and oxygen. It can leach toxic chemicals from pipe material also causing concerns because the toxic chemicals like MTBE, bisphenol may leach and contaminate the water.
Kitec Pex Plumbing ( Ipex )
Realtor’s and Home Inspectors cringe when they come across Kitec Pex Plumbing. Kitec Plumbing was named in a number of class action lawsuits in where a $125 Million Dollar Settlement fund was established. Unfortunately the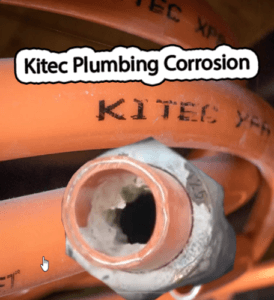 time for home owners to benefit passed after January 2020. Kitec plumbing was widely used in Canada and the U.S. in homes and condominiums built, or extensively renovated, between 1995 and 2007. It was sold for pipes for drinkable water pipes, as well as in-floor and hot-water baseboard systems. Most plumbing experts will tell you its not if it will fail but when it fill fail which is the issue. Kitec is only rated for 180 deg F tempurature which will cause your pipes to burst rather than leak. In floor heating systems are easily identified by big letters on manofold, “IPEX”
During a home inspection in Penetang the Kite plumbing pipes had boxes and luggage piled in front of the Kitec Plumbing lines making it very difficult if not impossible to identify. It was only after emptying the storage out of small utility area that the Kitec Pex lines could be identified. Ironically I was called back to the same home by a different client about 6 months later and he negotiated the installation of a new heating system to be installed to replace the infloor heating system.
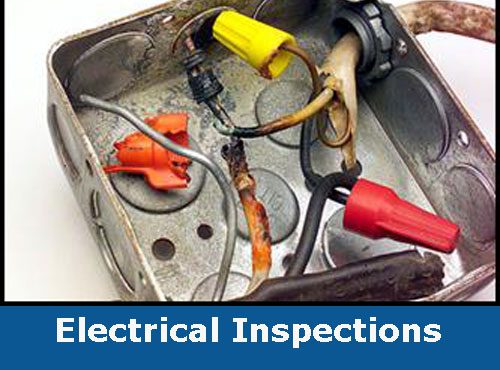
Electrical inspections are required to comply with requirements of the Electricity Act 1998 and the Ontario Electrical Safety Code (Ontario Regulation 10/02). It is the law. All electrical installations, renovations, and alterations are required to have an electrical inspection.
Read More
In Ontario, electrical installation, repair and replacement work needs to be done in compliance with the Ontario Electrical Safety Code. The Code specifies how electrical work must be done. The Code is updated every few years to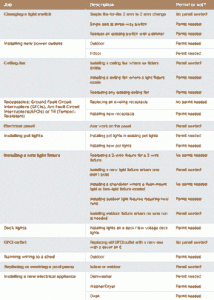 address emerging technology and improvements in safety practices. The image to the right shows what work or changes requires an electrical inspection.
Any work in the main electrical panel requires an electrical inspection permit. This includes like-for-like replacement of a failed breaker.
Aluminum Wiring Inspection
Barrie Home Inspections has found removing the main electrical panel cover is the best way of determining if there is any aluminum wiring installed. Inspecting the neutral bar connections is typically the best way to find any installation of aluminum wiring. If the are a junction boxes close to the main panel I will always try and remove the cover and wire nuts to ensure copper wire cable has not been attached to make panel connections. Aluminum wiring has “Al” or “Aluminum” marked every few feet along the length of its insulating jacket. CO/ALR wiring devices, like the one shown above, have special terminals designed just for aluminum wiring.
In North American residential construction, aluminum wire was used for wiring entire houses for a short time from the 1960s to the mid-1970s during a period of high copper prices. Electrical devices (outlets, switches, lighting, fans, etc.) at the time were not designed with the particular properties of the aluminum wire being used in mind, and there were some issues related to the properties of the wire itself, making the installations with aluminum wire much more susceptible to problems. Revised manufacturing standards for both the wire and the devices were developed to reduce the problems. Existing homes with this older aluminum wiring used in branch circuits present a potential fire hazard.
The most concerning problem with aluminum wiring is material change known as “cold creep”. When aluminum wiring heats up, it expands. When it cools down, it contracts. Unlike copper, when aluminum goes through a number of warm/cool cycles it loses a bit of tightness each time. To make the problem worse, aluminum oxidizes, or corrodes when in contact with certain types of metal, so the resistance of the connection goes up. Which causes it to heat up and corrode/ oxidize still more. Eventually the wire may start getting very hot, melt the insulation or fixture it’s attached to, and possibly even cause a fire.
Many Home Insurance Companies will not insure a home which contains aluminum wiring circuits. Other Insurance Companies will require an ESA Inspection Certificate prior to insuring home.
Do It Yourself Electrical Wiring
During Home Inspections Barrie Home Inspections commonly finds electrical deficiencies which indicate that electrical work had been done by someone other than a licensed electrician. Some of the most common deficiencies are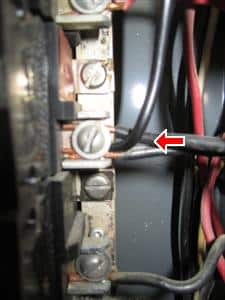 the following:
Double Tap Connections on Main Panel
This is the practice of attaching two electrical wires to a breaker or fuse connection. This is not permitted unless the main panel and breaker are designed for this particular type of connection. The illegal 3 wire connection to breaker, shown in image to the right, would indicate electrical work was done without permit of inspection.
Receptacle with Open Ground
The most common causes of “open ground” is an older two wire cable which does not contain a ground wire. The cause of an “open ground” is a broken ground wire on the electrical receptacle.
Reversed Polarity
Reversed polarity is caused by reversing the neutral and hot connections are reversed on an electrical outlet. This issue has become more prevalent since the inception of receptacles having holes which allows bare wire to be inserted into this openings to connect outlet or switches. Many home owners will utilize this connection method without checking the polarity of connections, creating a reversed polarity connection. Home owners are unable to detect this unless they possess and use an electrical polarity tester. ( all outlets downstream from this outlet will also show reversed polarity as the power supplying them is backwards )
Unsecured Electrical Cables
Nonmetallic-sheathed cable shall be supported and secured by staples, cable ties, straps, hangers, or similar fittings designed and installed so as not to damage the cable, at intervals not exceeding 1.4 m (4½ ft) and within 300 mm (12 in.) of every outlet box, junction box, cabinet, or fitting. Flat cables shall not be stapled on edge. Also many homeowners may contruct metal stud walls for basement renovations and then proceed to install Romex Cable in the walls without using proper attachment materials. ( Romex cable is not permitted to be in contact with metal studs or metallic plumbing lines )
Illegal Electrical Connections
All electrical connections are required to made in an approved electrical box. Many times in older homes electrical connections are made in ceilings etc without an approved box or missing the required junction box metal cover.
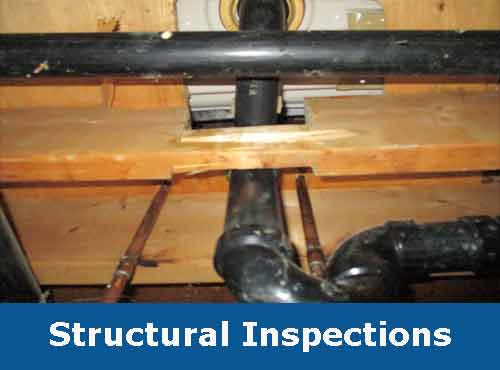
A structural inspection of a home is a visual assessment of common elements found in a typical home. The types of structure includes; columns, beams, trusses, plates and foundations. This inspection includes visual observations of those portions of the foundation, roof, and structural components readily visible.
Read More
Structural Modifications
Any change or addition of y0ur homes structural components requires a building permit and a stamped drawing or detail from a licensed engineer and or registered designer. All structural components of a residential home are governed by Part 4 of the Ontario Building Code. Any item not specifically prescribed in Part 9 or OBC shall be designed in accordance with Part 4.
Structural Deficiencies – Foundation
Concrete Foundations crack for many reasons including unstable soils, poor drainage and settling. Cracks may indicate serious structural problems and others may be insignificant. In North America approximately 60% of homes are built on soils with some clay content; of these more than half of the homes will experience damage. Soils with a heavy clay content may result in a foundation having a seasonally movement of 40 to 60 mm, 50mm equals about 2 inches. This soil movement is just one of a number of reasons that foundations crack or fail.
Diagonal Foundation Cracks
Diagonal foundation cracks are caused by differential settling of a foundation, which is where one side of a home’s foundation settles lower than the rest of the foundation. This type of uneven tension then causes diagonal cracking. Differential settling can be the result of the house being built on a hill, or due to the expansion or contraction of the soil under a portion of the home.
Horizontal Foundation Cracks
These types of cracks are the most serious type of crack to look out for, as they can signal serious damage to your home’s foundation and structural integrity. While these cracks are sometimes seen in homes with poured concrete foundations, they are most common in homes with concrete block or brick foundations. Several things can cause this type of foundation damage including soil pressure outside of your foundation, and hydrostatic pressure that can cause your basement walls to bow.
Structural Engineer Inspection
Any concrete supporting wall or floor exibiting signs of movement should be inspected by a Structural Engineer who can design a detailed drawing specifying what methods should be used to repair or prevent movement from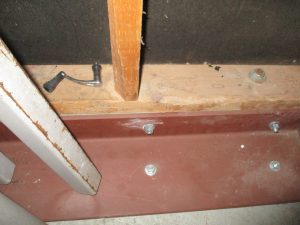 becoming worse. ( right side image of steel reinforcing installed as per instructions from a structural engineer ) Exterior wall movement was within requirements of Part 9 but continued movement would require repair to stabilize crack.
Engineered Floor Systems
There are 2 types of engineered joists are most frequently used in floor systems today; Wood I-Joists with dimension lumber top and bottom chords and OSB web and Open web trusses with wood webbing held together with metal plates. I joists typically have some pre-defined hole locations but they are very small, and any additional holes to be made must follow strict guidelines so as not to compromise support. Another added value to I joists is the ability to modify their length on site without an engineers approval.
Alterations for Engineered Wood Trusses
Truss members and components shall not be cut, notched, drilled, spliced or otherwise altered in any way without written concurrence and approval of a registered design professional. Alterations resulting in the addition of loads to any member (e.g., HVAC equipment, piping, additional roofing or insulation, etc.) shall not be permitted without verification that the truss is capable of supporting such additional loading.
Wood Floor Joists
Holes in Wood Floor Joists
According to Part 9 of the Ontario Building Code requires holes in roof, floor or ceiling framing members shall be not larger than one-quarter the depth of the member and shall be located not less than 50 mm (2”) from the edges, unless the depth of the member is increased by the size of the hole.
Notching of Wood Floor Joists
Notches in roof, ceiling and floor framing are allowed in the top of the member within ½ the depth of the joist size from the edge of
bearing. Notches are not permitted to be deeper than ⅓ the depth of the framing member unless the framing member has been
increased in size by the size of the notch.
Barrie Home Inspections provides Free Consultations to individuals wanting more information regarding issues their home may have. Call Roger at 705-795-8255
Home Inspections Details – Click + Icon to Read More
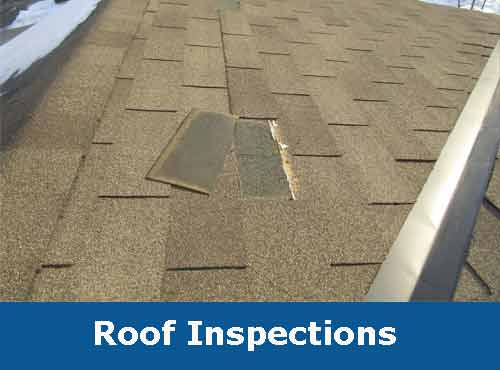
Roof inspections are a visual examination of your roofs components. The inspection includes looking for mold or mildew, damaged or poorly installed flashing, missing shingles from wind, water or age of shingles and large amount of UV granular protection in the gutter. ( large amount of granular material could be indicator of shingles breaking down.
Read More
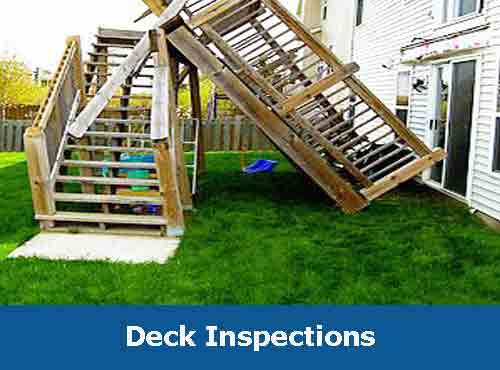
Inspecting your deck on a regular basis is highly recommended. Inspection, Maintenance and Repair are required to ensure your deck looks good and stays safe. Maintaning your deck includes looking for evidence of rot, whether a visual inspection or light probing using a sharp object. Repair or replace any damaged wood found.
Read More
Wood Rot – Deck Inspection
Wood rot is the main culprit which will require a complete deck replacement of at the very least replacement of wood decking. Look for areas of dark staining in wood surfaces and probe will sharp instrument to confirm areas of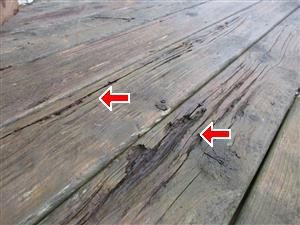 rot. Another cause of dark staining on your deck can be caused by mould and mildew. Deck mildew also causes dark stains on your deck and is caused by tannins in the wood reacting to the fungus. Oxalic acid can be used to remove these stains.
The wood deck picture on the right shows deck boards that have been allowed to deteriorate to the point where deck requires replacement. During this particular inspection it was found that the wood rot had extended to the deck connection to rim joist area which also had to be replaced. Proper construction methods would have prevented moisture damage and eventual rot to the homes rim joist.
Wood Deck Collapse
A landmark study in the United States revealed that between January 2000 and December 2006 there have been 179 reported deck collapses, killing 33 people and injuring 1,122. The single most cause of these collapses was the deck separating from the house. Many older homes or homes built without obtaining a permit will be connected to the house using nails. The Ontario Building Code requires a minimum of 3/8 inch bolts or lag bolts installed every 16 inches on center. ( recommended at staggered heights to prevent ledger board from splitting.
Ledger boards can be very complicated to install properly. A lot will depend on what type of rim joist you have and whether you have engineered floor joist installed in your home. Arbitrarilly adding wood blocks to engineered floor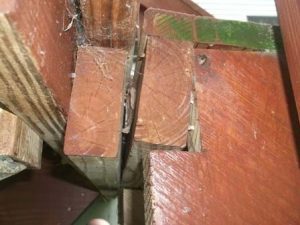 joists to attach bolts for ledger board might sound like a fine idea, it is not permitted. Any change of designed use of an engineered floor truss would require a stamped drawing detail from an engineer. Also placement of engineeered floor joist may make access to rim joist area difficult to access. Image to the right shows an improperly installed ledger board which is starting to separate.
Most joist hangers used for decks have to be stamped with a Z ( Simpson Strong Ties ) which means they are galvanized and rated for exterior use and also with pressure treated lumber. Another common mistake when using joist hangers is not using the right nail. Simpson Strong Ties website has a chart showing the required nail to be used for every appliacation. ( Deck nails should be identified with a 10 stamped on the head of nail )
On many home inspections the first issue I typically find is someone used wood deck screws to secure joist hangers in place. This is a huge Red Flag that the deck was built without a Building Permit and has never been inspected. Deck screws are not rated for shear strength and could easily fail. The joist manufacture will specify what type of screw must be used if you feel that you don’t want to use nails.
Buildng Permit Required
Any deck that is higher than 23 /5 inches or greater above finished grade requires a Building Permit. Also if any structural modifications or renovations are made a Building Permit is required prior to commencing work. There will be typically 3 inspections prior to completion of your deck. Excavation and footing inspection, Structural Wood Framing inspection and Final Building inspection. You will also have to supply the local Building Department with Site Plan and a detailed deck drawing of planned construction. ( most cities and municipalities have this information on their websites )
Guard and Railing Requirements
There are different guard height requirements depending on distance from deck walking surface is to finished grade. For decks ranging from 24 inches to 5 ft 10 inches a guard height of 36 inches is required. Decks whose walking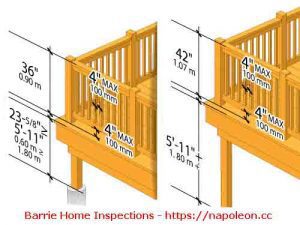 surface is higher than 5 ft 10 inches above finished grade require a guard height of 42 inches. ( see diagram to right for dimensions )
During your annual inspection of the condition of your wood deck, it is recommended that you test the stability of your posts and guards, checking for cracks, wood rot and wobbly supports. Wood lumber will contract and expand with the changing seasons so looking for loose nails or deck boards is also recommended
Oro-Medonte Deck Requirements
Decks that DON’T require a Building Permit or Zoning Certificate include:
a) Decks less than 23 5/8” (600mm) in height from walking surface to grade when
measured in accordance with the Ontario Building Code requirements,
b) Decks not providing access to the principal entrance, AND
c) Decks not structurally connected to a building.
NOTE: Regardless of whether a permit is required or not, setbacks from septic tanks, tile
beds and distribution piping is still required to be maintained.
Decks must not encroach any closer than;
a) Minimum 1.5m(5’) to Septic tank, and
b) Minimum 2.5m(8’) to Tile bed distribution piping.
Always consult with your local building department prior to starting construction to ensure you build safely and within the rules of your local building code requirements.

The exterior of your home has a lot of important areas that require detailed examination during your home inspection. Your homes exterior components provide similar protect that our skin provides for our body. Keeping out heat, cold, moisture and contaminants are just a few areas of protection provided by your homes exterior.
Read More
Your Exterior Home Inspection also includes foundations, grading, landscaping, porches, coverings and sidewalks etc. Water is one of the most damaging elements that can cause considerable damage to the exterior of your home and even enter and damage the interior.
Exterior Inspection – Landscaping
Water drainage on your lot can affect how much water or moisture your homes exterior will come in contact with. Most subdivision homes have built in swales by builder which are required to meet the water management plan disigned for that particular area. Typically the swales will run from the rear of your home to the front yard. Your rear yard may or maynot be sloped to direct rain, snow runoff and downspout discharge into these swales. Depending the natural slope of your lot some subdivisions will have storm drains installed to collect water and remove it, other lots may have a significant swale runing across the back of the lots to a storm drain on a street. What ever means that has been created it is important not to block the planned drainage methods.
Sidewalk Inspections
Many times when a sidewalk constructed beside a foundation it will eventually sag and slope towards the foundation. This results in all the water collected by sidewalk now being directed onto your foundation. The most common cause of this occurance is the fact that after a home is backfilled the area adjacent to the foundation is not compacted by machinery and eventually will settle. One cure for this would be to have area compacted with mechanical compactor prior to installing sidewalk.
Retaining Wall Inspections
Retaing walls can vary from simple wood beam construction, stone construction or inter-locking blocks. ( usually retaining walls are built by person with higher property – always check on this ) Construction of retaining walls should not be undertaken without a lot of planning and possibily a professional engineer may have to be consulted. ( check with your local building department prior to designing ) Prior to digging any trenches have your local utilities mark out all the services, no use adding onto the cost of your project. Another issue for retaining walls is that if your wall will redirect water from natural drainage, again you will have to consult with local building department. You may have to plan for draining the soil held back by your retaining wall as when the soil becomes saturated the pressures may actuall cause your wall to shift and / bulge. Repairing a retaining wall can be very expensive and time consuming so getting it right the first time is really important. Barrie Home Inspections will inspect your retaining wall to note any shifting, loose or gaps in materials or any visible bulging of wall.
Exterior Caulking
Exterior caulking is one thing that is noted on every home inspection report except for new buildings. Caulking is applied to all doors, windows and other penetrations of your Building Envelope. Caulking will prevent water entering this areas and causing unnecesary damge. Caulking can also prevent insect entery into wall cavities where they will take up residence and continue to create problems. Caulking on gutters, roof flashings and any exterior material joints is also very important to inspect and ensure that there is no gaps of cracking of caulking.
Exposed Foundation
Concrete foundations are required to extend a minimum of 150 mm above finished ground level. This Ontario Building Code Requirement is often ignored when home owners modify their front entrance and install pavers etc up to or cover brick veneer. The problem then becomes the brick veneer, which if allowed to absorb moisture will spall the brick finish, when absorbed moisture freezes. I recommend spraying product, such as Thompson’s Brick Seal, to prevent brick from absorbing moisture.
Exterior Concrete or Brick Window Sills
Both of these types of window sills can develop cracks in brick mortar or on split concrete window sill joints. Water will enter these cracks and slowly expand joints allowing water to penetrate deeper and deeper. Eventually brick will spall on brick window sills and on both concrete and brick sills, continue downward until water starts damage joints and brick below window sills. It is important to check this mortar joints prior to winter and the subsequent freezing temperatures.
Basement Window Wells
Many times the builder will leave drains sticking out of basement window wells with no protection. These drains are directly connected to your homes weeping tile which teminates at your sump pump. Leaving an open drain is an invitation for debris or even a childs toy to enter drain and eventually blocking your weeping tile. During a home inspection I will always recommend that the drain be trimmed down to grade stone in the window well and either protected by covering opening with screen, cap or filled with clean stone.
Soffit Vents and Fascia
Soffit venting is an integral part of a homes attic ventilation system. The Ontario Building Code requires that when a roof slope is less than 1 in 6 or constructed with roof joists, the unobstructed vent area shall be not less than 1/150 of the insulated ceiling area. Other types of roof construction shall have unobstructed vent area of not less than 1/300 of the insulated ceiling area. 25% of the required venting is required to be located at top section of roof and 25% is required to be at the bottom section of roof.
Unfortunately just because vented soffit in installed it does not always indicate proper venting. Recently I received a report from a Building Engineer which depicts solid plywood which had vented soffit installed over top. 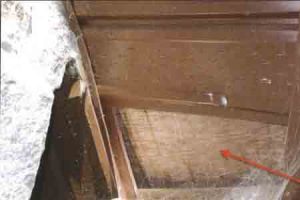 Obviously the contractor was either lazy or had no idea of what he was doing. The image on the right clearly shows the plwood blocking the attic soffit vents. Lack of soffit ventilation can cause problems with mould, ice damming in the winter and extreme tempertures in the hot and cold seasons. Extreme heat in an attic is know to reduce life expectancy of shingles.
This blocked vent problem was just one of many items found deficient in the home and the homeowners allowed him to do destructive investigation which identified a lot of serious deficiencies that otherwise would have not been discovered. As noted all across my website a home inspection is a limited, non-invasive examination of the condition of a home at the time of the inspection. ( non-invasive being the key word here….in the situation indicated by image the home owner consented to a destructive form of inspection )