
A WETT Inspection includes Inspecting your Flue Pipes
Flue pipes maybe called smoke pipes, chimney connectors and flue connectors. CSA B365 refers to this pipes as Flue Pipes.
Flue Pipe Overview
Flue pipes run between the wood burning appliance collar and the entrance to the chimney. The Flue Pipe is an important component because its size, length, arrangement and installation affect the performance and safety of your wood burning system. Improper installation can endanger your home and your family.
Currently flue pipes are available in a variety of materials.
Blue steel pipes are made of un-coated steel and are typically not suitable for use with a wood burning appliance.
Flue Pipe Inspection
Exterior Inspection
Check clearances: Ensure single-wall pipes maintain 18 inches and double-wall pipes maintain 6 inches from combustible materials.
Examine joints: Verify each pipe joint is secured with at least three metal screws.
Look for damage: Check the surface for rust flakes, pinholes, water streaks, or sagging horizontal runs.
Check Visually: Look for signs of spotting, external decay and soot stains near connections.
Internal Inspection
Look from below: Open the stove damper or remove internal baffles, then shine a bright flashlight up the pipe to spot heavy soot or obstructions.
Measure creosote: Scrape the buildup; if creosote thickness exceeds 1/8 inch, the system needs an immediate and thorough cleaning.
Inspect from the roof: Remove the chimney cap and use a weighted brush or camera to check for structural cracks, nests, or heavy blockages.
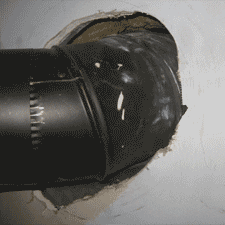
Picture of an incorrectley installed flue pipe passing through a combustible wall.
To pass a flue pipe through a combustible wall safely and in compliance with WETT (Wood Energy Technology Transfer) standards and CSA B365 guidelines, you must transition from single-wall indoor connector pipe to an approved insulated UL 103 HT Class A chimney system using a certified wall thimble pass-through assembly. Never run single-wall or uninsulated connector pipe directly through a combustible wall or concealed
Proper Installation Steps
- Plan the Layout: Ensure your indoor connector pipe rises vertically from the stove before making any horizontal run through the wall. Horizontal connector runs must slope upward at least 1/4 inch per foot toward the chimney.
- Transition Early: Convert your single-wall pipe to a double-wall connector or directly tie into the Class A insulated chimney/cleanout tee before entering the wall thimble assembly.
- Frame the Opening: Cut and frame a square hole in the combustible wall precisely sized to the dimensions dictated by the wall thimble manufacturer's instructions.
- Install the Wall Thimble: Secure the inner and outer halves of the certified wall thimble into the framed opening, ensuring solid blocking/framing supports it and the required air clearances to wood studs and insulation are strictly met.
- Support the Chimney: Install an exterior tee with a cleanout cap and secure the vertical Class A chimney pipe using heavy-duty wall support brackets and wall bands.
- Seal the Joints: Secure all pipe joints with a minimum of three high-temperature sheet metal screws, and seal connections properly using high-temperature stove cement or silicone where required by the manufacturer.
Articles You May Enjoy
Home Inspectors Barrie Ontario
Midland Home Inspector
Home Inspector Midland
Home Inspection Guide
Orillia
WETT Inspection Information
Innisfil WETT Inspections
Flue Pipe Installation
WETT Certified Inspection - Floor Protection
Inspections
Pre-Delivery Inspections
Pre-Listing Inspection
Pricing Policy
Privacy Policy
Types of Inspections
Areas Inspected
(705) 795-8255
roger@napoleon.cc
Inspection Areas
Barrie • Alliston • Angus • Innisfil • Wasaga Beach • Orillia • Midland • Penetanguishene
Contact Information
Roger Frost
Certified Building Code Official
Certified Master Inspector
Phone: 705.795.8255
Email Roger

Certifications


